How to configure FreeDNS in Ubuntu
This is a post in a serie on how to configure your personal mail server that I started long time ago.
I originally published a different approach, but I find that the one shown here is better.
To prepare our server, the first thing we want to do is to make sure that we can reach it from the Internet with an unique name. The reason for this is twofold:
- We want to be able to reach our server from a mail client, be it on our laptop or our mobile phone. This is expecially true if the server will stay behind a home connection (i.e. without a static ip).
- We will setup certificates to enable secure communication between the client and the server, and for this we need to give a name to our server (to be exact, this is not strictly required, but will make things much more simpler).
One approach is to buy a domain name and associate it to the IP of our server. This will work only if the IP address if fixed, and while a domain name is usually cheap it doesn’t come for free. A simpler approach is to use a free DNS service that will allow us to register a subdomain and update the address whenever the IP changes. Will follow this approach in this post.
Port forwarding
Most domestic users connect to the Internet either through a router using a landline (e.g. ADSL or Fiber connection), or through a mobile carrier, maybe by using a phone as a mobile hotspot or with a (e.g. 4G). In both cases the Internet address that the provider give us is assigned to the router (or hotspot) so we need to configure the latter so that it will forward the connections to the mail server to the right machine.
I will not try to cover this topic here (it depends a lot on the device used to connect to the Internet) but there are two important things to remember.
The first is that there are three ports that need to be forwarded from the router (or your phone) to the machine that will run the mail server
- Port 80 (http, used for setting up the TLS certificates)
- Port 443 (https, ditto)
- Port 993 (imaps, the one actually use to access our mails)
You can decide to use different ports for the services above, but in the following I will always assume that the standard ports are used, so you may have to change accordingly the commands used and/or the configurations that I will suggest.
The second point is that you have to be sure that the your router itself is reachable from the Internet ! Expecially with wireless connections, many ISP these days employ what is called CGNAT, where your router is not on public Internet, but behind another router in a network internal to the ISP. If that is the case you most probably you will not be able to access the port that you have forwarded, so once you have done the forwarding, you should use an online port scan service to check that they are in fact reachable. There are many free services online that can help you with this (I am not suggesting any in particular, but you can find plenty by googling something like “open port tester”).
It is worth repeating: if you cannot access the open ports from the Internet, there is no point in configuring Dynamic DNS. You will not be able to access your emails from outside, and we will need a different approach to install the certificates for the mail server..
Dynamic DNS
Dynamic DNS services are services that allow us to associate an IP address with a (sub)domain name, and update the address whenever it changes. This works by setting a low time for the validity of the DNS entry, so even if it changes often our ISP’s DNS server will usually give us the updated value. On the downside, this usually means that we will make more requests for our name, but this is not something problematic in our case.
There are many services available (or at least there used to be, it seems that many closed), but for this post I will use FreeDNS, since is the one I have been using for many years and has never caused me any problem
User Registration
The first step is to register ourselves, if we don’t have an account already. The starter plan is valid only up to 5 subdomains, if you need more, you may choose for a paid plan. I will not enter the details since the procedure is quite straightforward and only requires a valid email
Creating a new DNS entry
Once you have registered and logged in, you can go to the subdomain page, and click on the add link. You will presented with a form similar to the following:
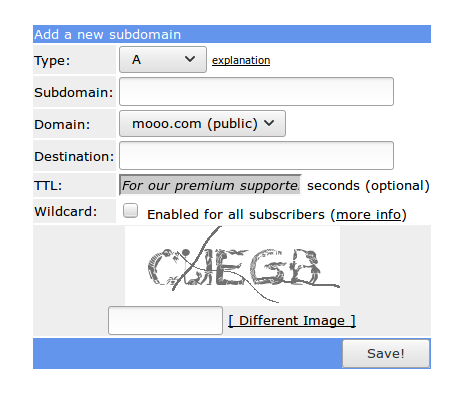
- in type you should put A if you use an IPV4 address (most likely) or AAAA is you use an IPV6 address. You can of course register two entries, one for IPV4 and one IPV6, if you have both.
- subdomain should contain the name that you want to register, for example mymailserver.
- domain is the domain under which you want to put your name, you can choose whatever you prefer among the available choices.
- destination is the ip address of your server. You can ignore for now the value (it should contain the IP of the machine you’re connecting from) since we will update it automatically.
You can ignore the other fields (with the exception of the captcha :-) ) and save. If you choose mymailserver as subdomain, and mooo.com as domain, you will be able to reach your server with the name mymailserver.mooo.com.
Update the entry
The most critical part is keeping updated the entry. FreeDNS luckily offer several ways to do this. The one I suggest doesn’t use any special packages, but only cURL or wget command line tools, easily available on any linux platform I found all other approaches to be unreliable (including using the relevant functionality available in most home routers). In fact FreeDNS’ website provide almost all the work to use one of such tools, you just need to go to the Dynamic DNS page, and click on “quick cron” at the bottom. Of the resulting file, what we want is the ending 4-5 lines, which will be something like
# You might need to include this path line in crontab, (or specify full paths)
PATH=/sbin:/bin:/usr/sbin:/usr/bin:/usr/local/sbin:/usr/local/bin

3,8,13,18,23,28,33,38,43,48,53,58 * * * * sleep 39 ; wget -O - http://freedns.afraid.org/dynamic/update.php?xxx >> /tmp/xxx_mooo_com.log 2>&1 &
You should enter those line inside the crontab file, which can be edited by writing
crontab -e
on the command line (you don’t need any special permission for this command, so it can be done with any user that has internet access) The above script will update the record (if necessary) every five minutes. This means that in the worst case after an IP change you my have to wait up to five minutes before being able to reach the server.
The downloaded file contains also examples for other tools if you don’t like wget. In any case don’t forget to install the relevant tool with
sudo apt-get install wget
or
sudo apt-get install curl
These commands are valid for Ubuntu and other Debian-like distros. For other distro, you should use the relevant tools (such as yum).